Spring is here and we have soo many strawberries available in the market! I will write about the benefits of strawberries later, but lets talk about the wonderful things we can do with them. Our versatile strawberry, for cake toppings, desserts, icecream, jams, and then those milkshakes…ooh la la… and what about cocktails and mocktails? I bought a lot of strawberries and was wondering what do i do with them? I then said why dont i make something nice to drink? So..this is my concoction..a mocktail and a cocktail!!
INGREDIENTS:
2 cups of soft strawberries, washed , pat dry and put in the freezer for about 30-60 minutes till frozen
2-3 tablespoons of sugar syrup (just combine 2-3 tablespoons of water with 2 tablespoons of sugar and mix well)
a few drops of lime juice
4 tablespoons of orange juice ( i used clementine juice)
METHOD:
Put the frozen strawberries with all the ingredients in the blender ( i used my magic bullet) and blend till well blended. If you like your slush a little more watered down you can add some sparkling water or 7-Up!! Serve in a fancy glass and drink immediately!
FOR THE COCKTAIL:
Use the same recipe as above and just add a shot of vodka and a shot of cointreau…Blend it all and sip….oooh!!!
NITU DIDI TIP: The sugar syrup is optional.
HEALTH BENEFITS OF STRAWBERRIES:
Apart from Vitamin C, strawberries are a good source of antixoidants that help you fight cancer, and insure you a healthy immune system. I cup of strawberries contains less than 50 calories so its good for your calorie control diet. Do make your mocktail without the sugar syrup !!
TO BUY MY MAGIC BULLET : DO VISIT MY ONLINE STORE!
MAGIC BULLET VIDEO:
For the crust:
1 & 1/2 cup all purpose flour
1/2 to 3/4 cup butter at room temp. I prefer salted as it lifts the flavor nicely.
1/2 tsp. salt.
2 tbsp sugar dissolved in 1/2 cup cold water
Mix the salt with the flour and add the butter. With light fingers cut in the dough until flour is about the size of peas. Do not over work the dough. Sprinkle the cold water with one hand as you gather the dough with the other hand and form it into a ball. Do not over work the dough else the crust will not be flaky. Roll out dough to the size of tart tin and prick the bottom of the crust with fork. Bake for about 40 mins in a preheated oven at 250 degrees. You will know its baked when the crust has a golden color and from the aroma.
 For the filling:
2 cups fresh full cream milk
2 egg yolks (can omit them also)
2 tbsp. cornflour
1 tbsp. unflavored gelatin
3/4 to 1 cup sugar, depending on your taste
1 tsp vanilla extract
1 tbsp butter
Whisk all the ingredients and cook on low heat while mixing constantly to avoid lumps and scalding. When thick remove from fire and let stand for five minutes then pour into tart shell. Top with sliced mangoes and gelatin topping to give it a glaze and prevent mangoes from turning color.

Gelatin glaze:
1 tbsp unflavored gelatin dissolved in 1/4 cup hot water to which a tsp of lemon juice is added. Spoon over the tart and refrigerate. Serve with joy.
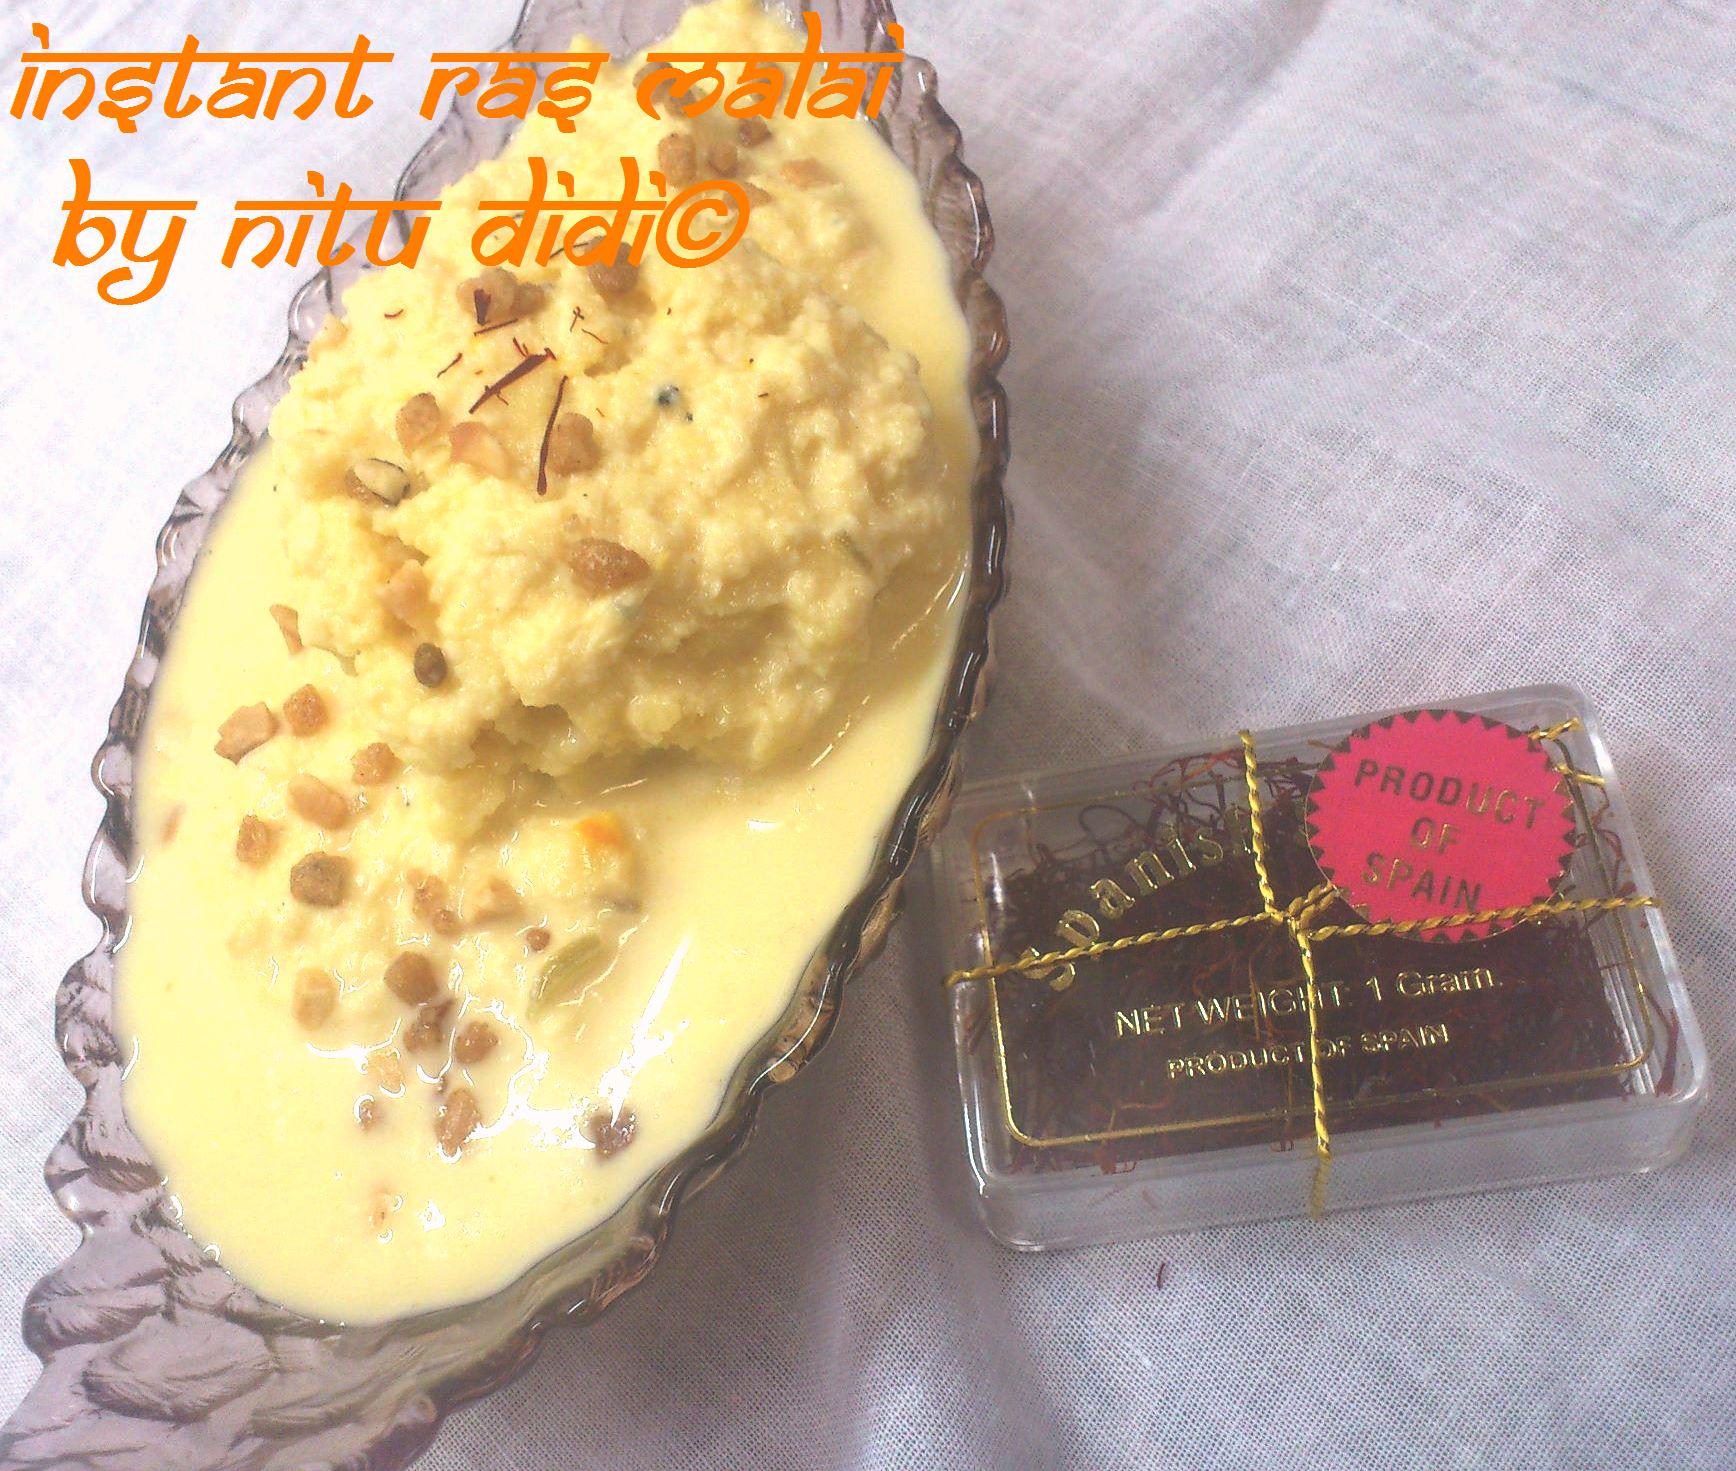
I first came across this instant ras malai recipe when i was a newly wed bride (33 years ago!!!) in the cookery section of the reputed magazine Femina. I tried it and what a disaster it was!! I gave up trying any recipe from a magazine for quite sometime! Then decades later Nitu Chugani became Nitu Didi and i saw soo many recipes of the same rasmalai on soo many cooking pages, but by then i was making the ras malai the original way with paneer. So…i did not even bother…Till one day, pressed for time, i wanted to make dessert for my students now turned friends Adam Simmons and Stevie Mitchell. I decided to try out this instant rasmalai again! I keep on reading how people comment about how it does not turn out the way it should. I will give u this recipe with the tips, and i cross my fingers it should turn out for all of you.
INGREDIENTS:
200 grams of full fat milk powder, I used THIS one
2 litres of full fat liquid milk
1 medium sized egg, beaten
1 teaspoon of baking powder
9 tablespoons of sugar or to taste
3/4 teaspoon of cardamom powder
10-15 strands of Nitu Didi Pure Spanish Saffron
nuts of your choice for garnish.
METHOD:
Take a deep breath and say ” yes i can”!!! If i can sweetheart, believe me so can you 🙂
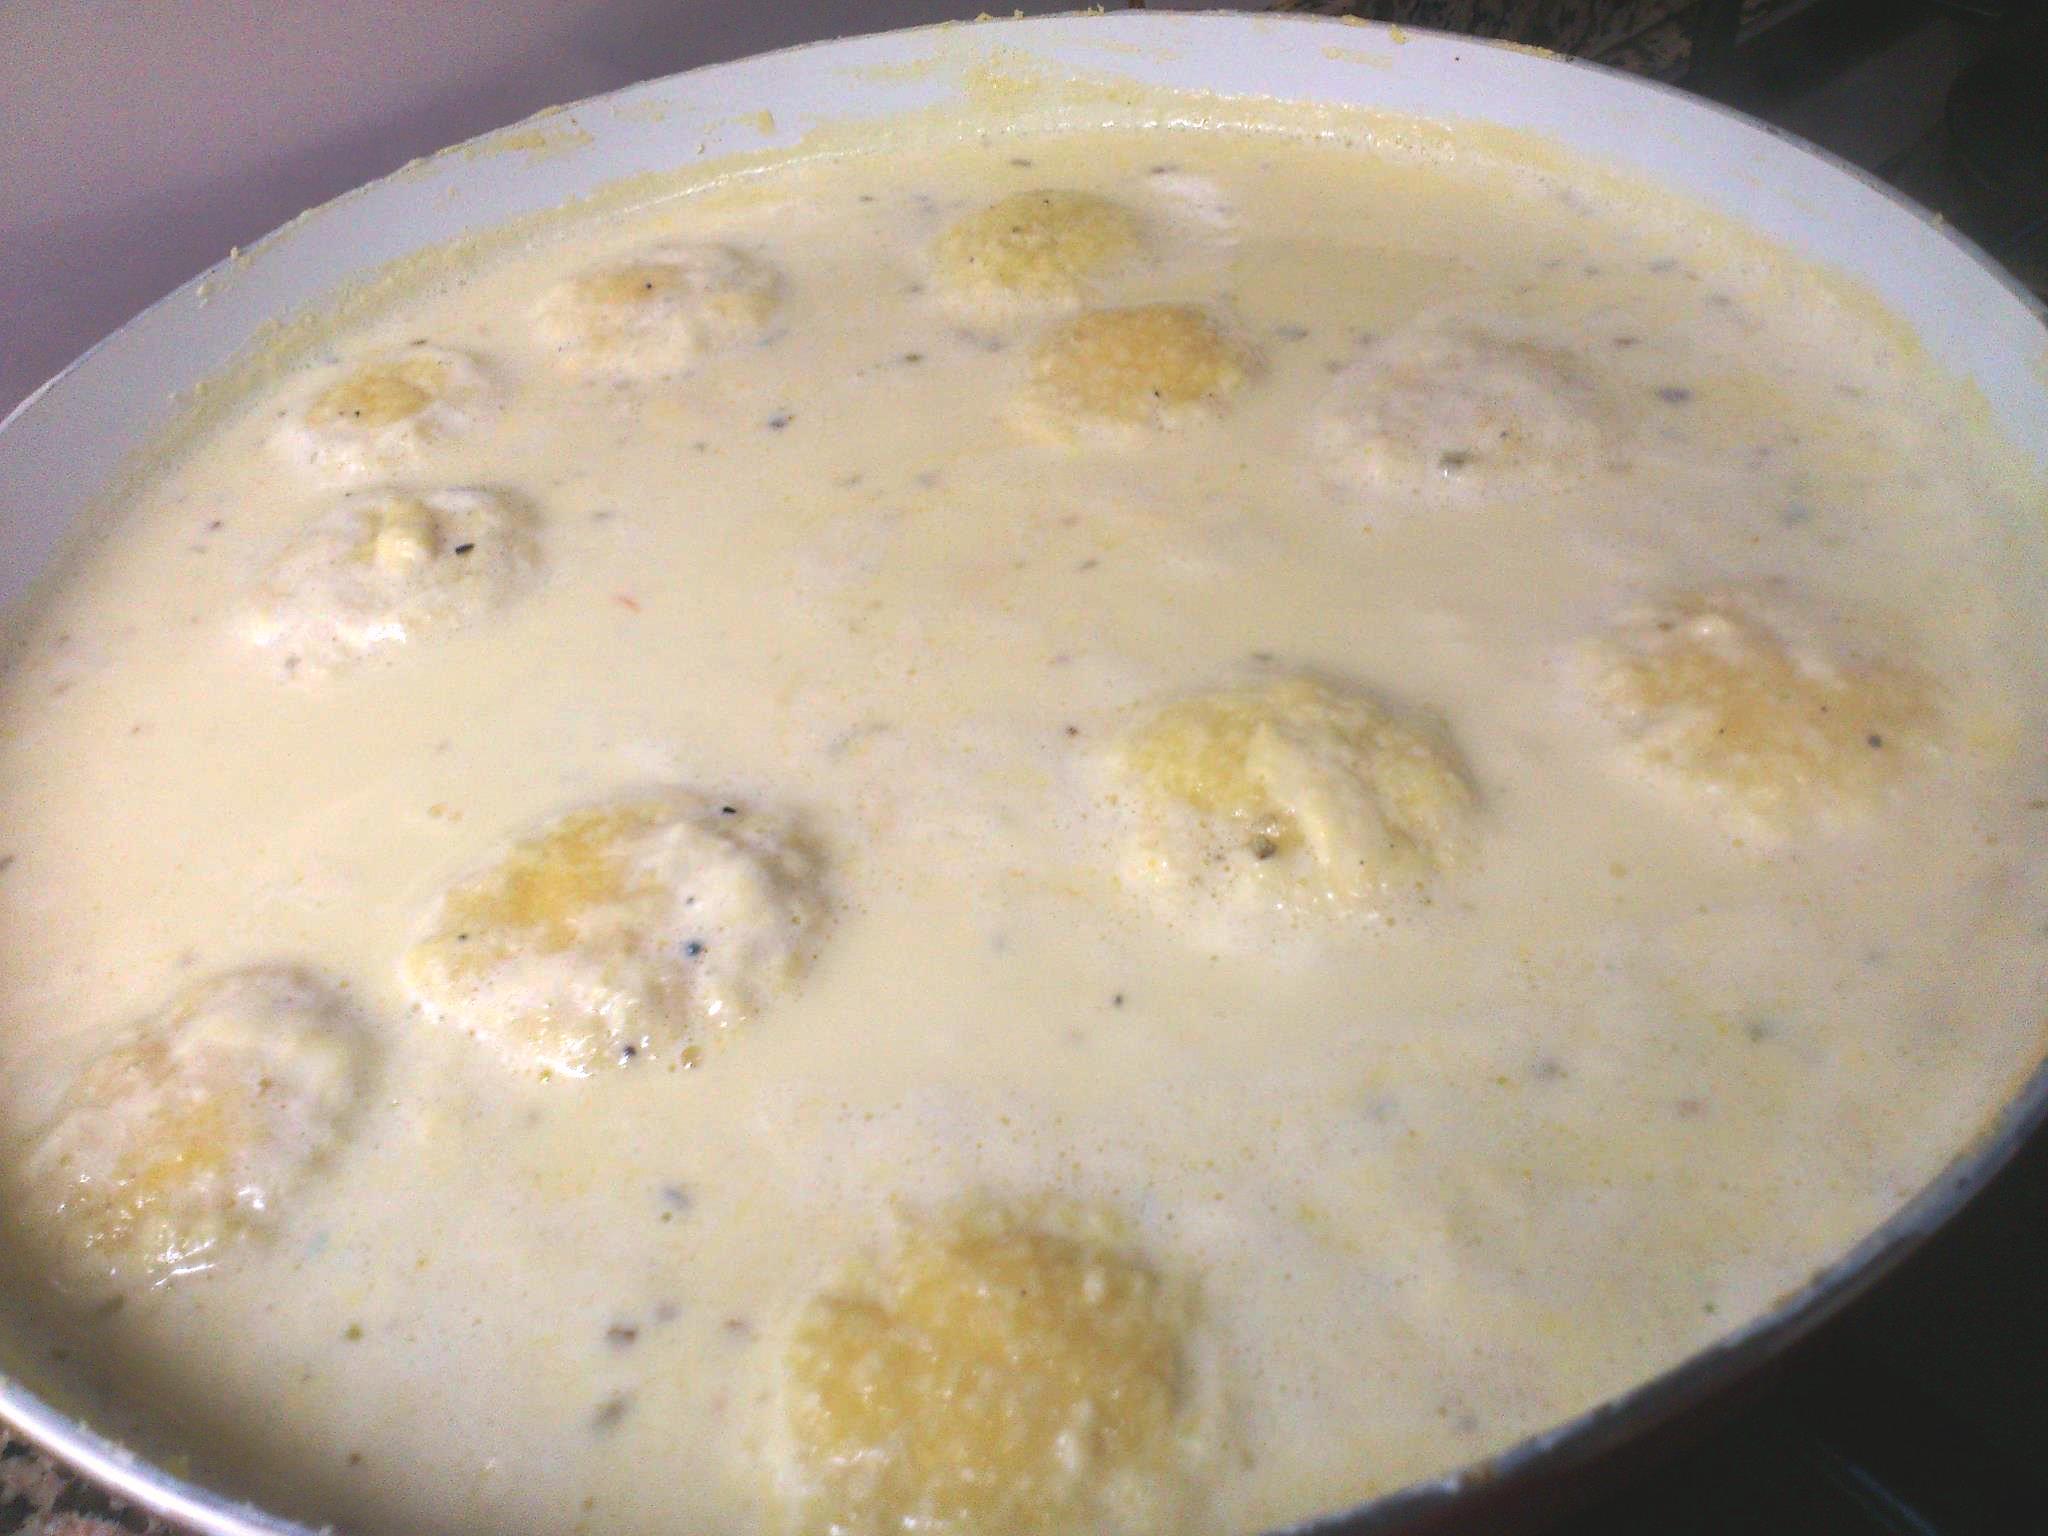
In a good wide frying pan that is about 3″ deep put the liquid milk to boil. I used a good, expensive frying pan, the milk started to stick to the bottom , so i quickly had to change it into my ceramic pan and it did not stick at all. The pan has to be wide, so please use the widest pan you have. While the milk is boiling, take the milk powder and put it into a bowl. Mix it with the baking powder well. Add the beaten egg, spoon by spoon and make a dough with the milk powder. Please do not put all the egg at once, if it gets too soft you will need to add more milk powder and then i dont know if the recipe will turn out. Make into a dough like for chapattis. Leave it covered while you keep on stirring your milk. After 15 minutes the dough will be a little hard and dry (this tends to happen with milk powder dough). Add a tiny bit more of beaten egg and make it into a soft dough. Keep on kneading till you see your hands are oily (this took me about a good 7-8 mins of arm excercise…and YET my arms are fat!!!) Once you see your palms are greasy means yayyy…your dough is perfect. Now make small balls the size of a marble (try to use pressure while making the balls), in case your dough is crumbly and not oily, you need to add more beaten egg AND work on the dough a bit more. Press the balls slightly to flatten them. Meantime add sugar, saffron and cardamom to your milk which should have reduced in quantity by now. Drop the flattened milk discs into the milk gently with love and bring the whole mixture to a boil. Do not move with a spoon. The malais will swell in size. Just keep on shaking the pan gently as you would your babies crib. Leave to boil for about 15 minutes and just watch as your lovely malais fluff up and swell. Taste it, the milk should be quite sweet because when it cools it loses sweetness. You can add more sugar if its less sweet. Touch one malai gently, if its nice n soft then your done!!! Cool the mixture completely. I then added a tablespoon of rose essence, but thats upto you. Add nuts of your choice on the top and serve it chilled.
NITU DIDI TIP:
If you follow this recipe properly you should have the most amazing rasmalai ever. My husband ate it today and said it was even better than the eggless one and as good as any restaurant. I kept on thinking by putting egg in it, it would smell eggy or something, but NO…It was just amazing…. For best results use Nitu Didi Pure Spanish Saffron where you can buy it HERE
This is the pic of the malais in the ceramic pan, to buy it please visit my online store
This is the video on Nitu Didi Saffron and its benefits
This recipe was an on the spur of the moment creation of mine one saturday morning. I wanted to have an “aloo tikki” which is an indian potato cutlet with a “difference”. I thought of many types of stuffing and then got inspired by an idea. I had some red capsicum in the fridge and thought why not stuff it with that? I put on my thinking cap…and came up with this… Made it, took out a pic..and uploaded it on facebook to have dozens and dozens of comments for the recipe. I was taken aback…such a simple thing..and yet managed to get so many comments? So as i always tell you all ” i might delay in writing a recipe, but in the end i do.”. Here is the recipe for all you vegetarians out there, have never experimented so much with vegetarian dishes before !
INGREDIENTS:
3 medium sized potatoes, boiled and mashed
1 teaspoon of salt or to taste
1/2 teaspoon of black pepper powder
Juice of 1/2 lime
1 teaspoon of whole cumin seeds
2 green chillies chopped or to taste or omit if you do not want it spicy
1/4 cup of finely chopped coriander leaves, i used my magical scissors for this
1 cup of mashed potato flour ( its that ready made potato mash mix that you get)
capsicum cut into cubes as needed
grated cheese as needed ( i used THIS one)
oil for deep frying.
METHOD
Mix the boiled mashed potatoes with the salt, pepper, lemon juice, green chillies and coriander leaves. Add the mashed potato flour and mix well. Now we need to test the mixture that it does not break so we heat up some cooking oil in a deep pan or fryer and take a small ball of the mixture and put it into the hot oil. If it does not break and fries perfectly without disintegrating we are fine!. If if does break up and splatter we need to add more potato mash flour. People also add breadcrumbs but this is a gluten free recipe! Once you have your mixture right, turn off the heat and lets shape our cutlets? Take a small amount of the mixture in your hand and form it into a ball (its easier if you grease your palms) and then flatten it. Add a small piece of capsicum and some grated cheese on the capsicum and bring the mixture together to cover the capsicum . Apply little pressure and seal it well. If its not well sealed the cheese will leak out while frying. Flatten it a bit to shape it into a cutlet. Make up all the cutlets the same way. Heat the oil and deep fry these cutlets till golden brown. Serve with sauce of your choice.
NITU DIDI TIP:
If you do not have potato mash flour you can use grated bread instead. I prefer potato mash flour as the cutlets get non greasy and crispy. I have not specified the amount of potato mash flour as it depends on the moisture in the boiled potatoes. For vegans you can use vegan cheese
Do visit my online store if you want to buy my magical scissors
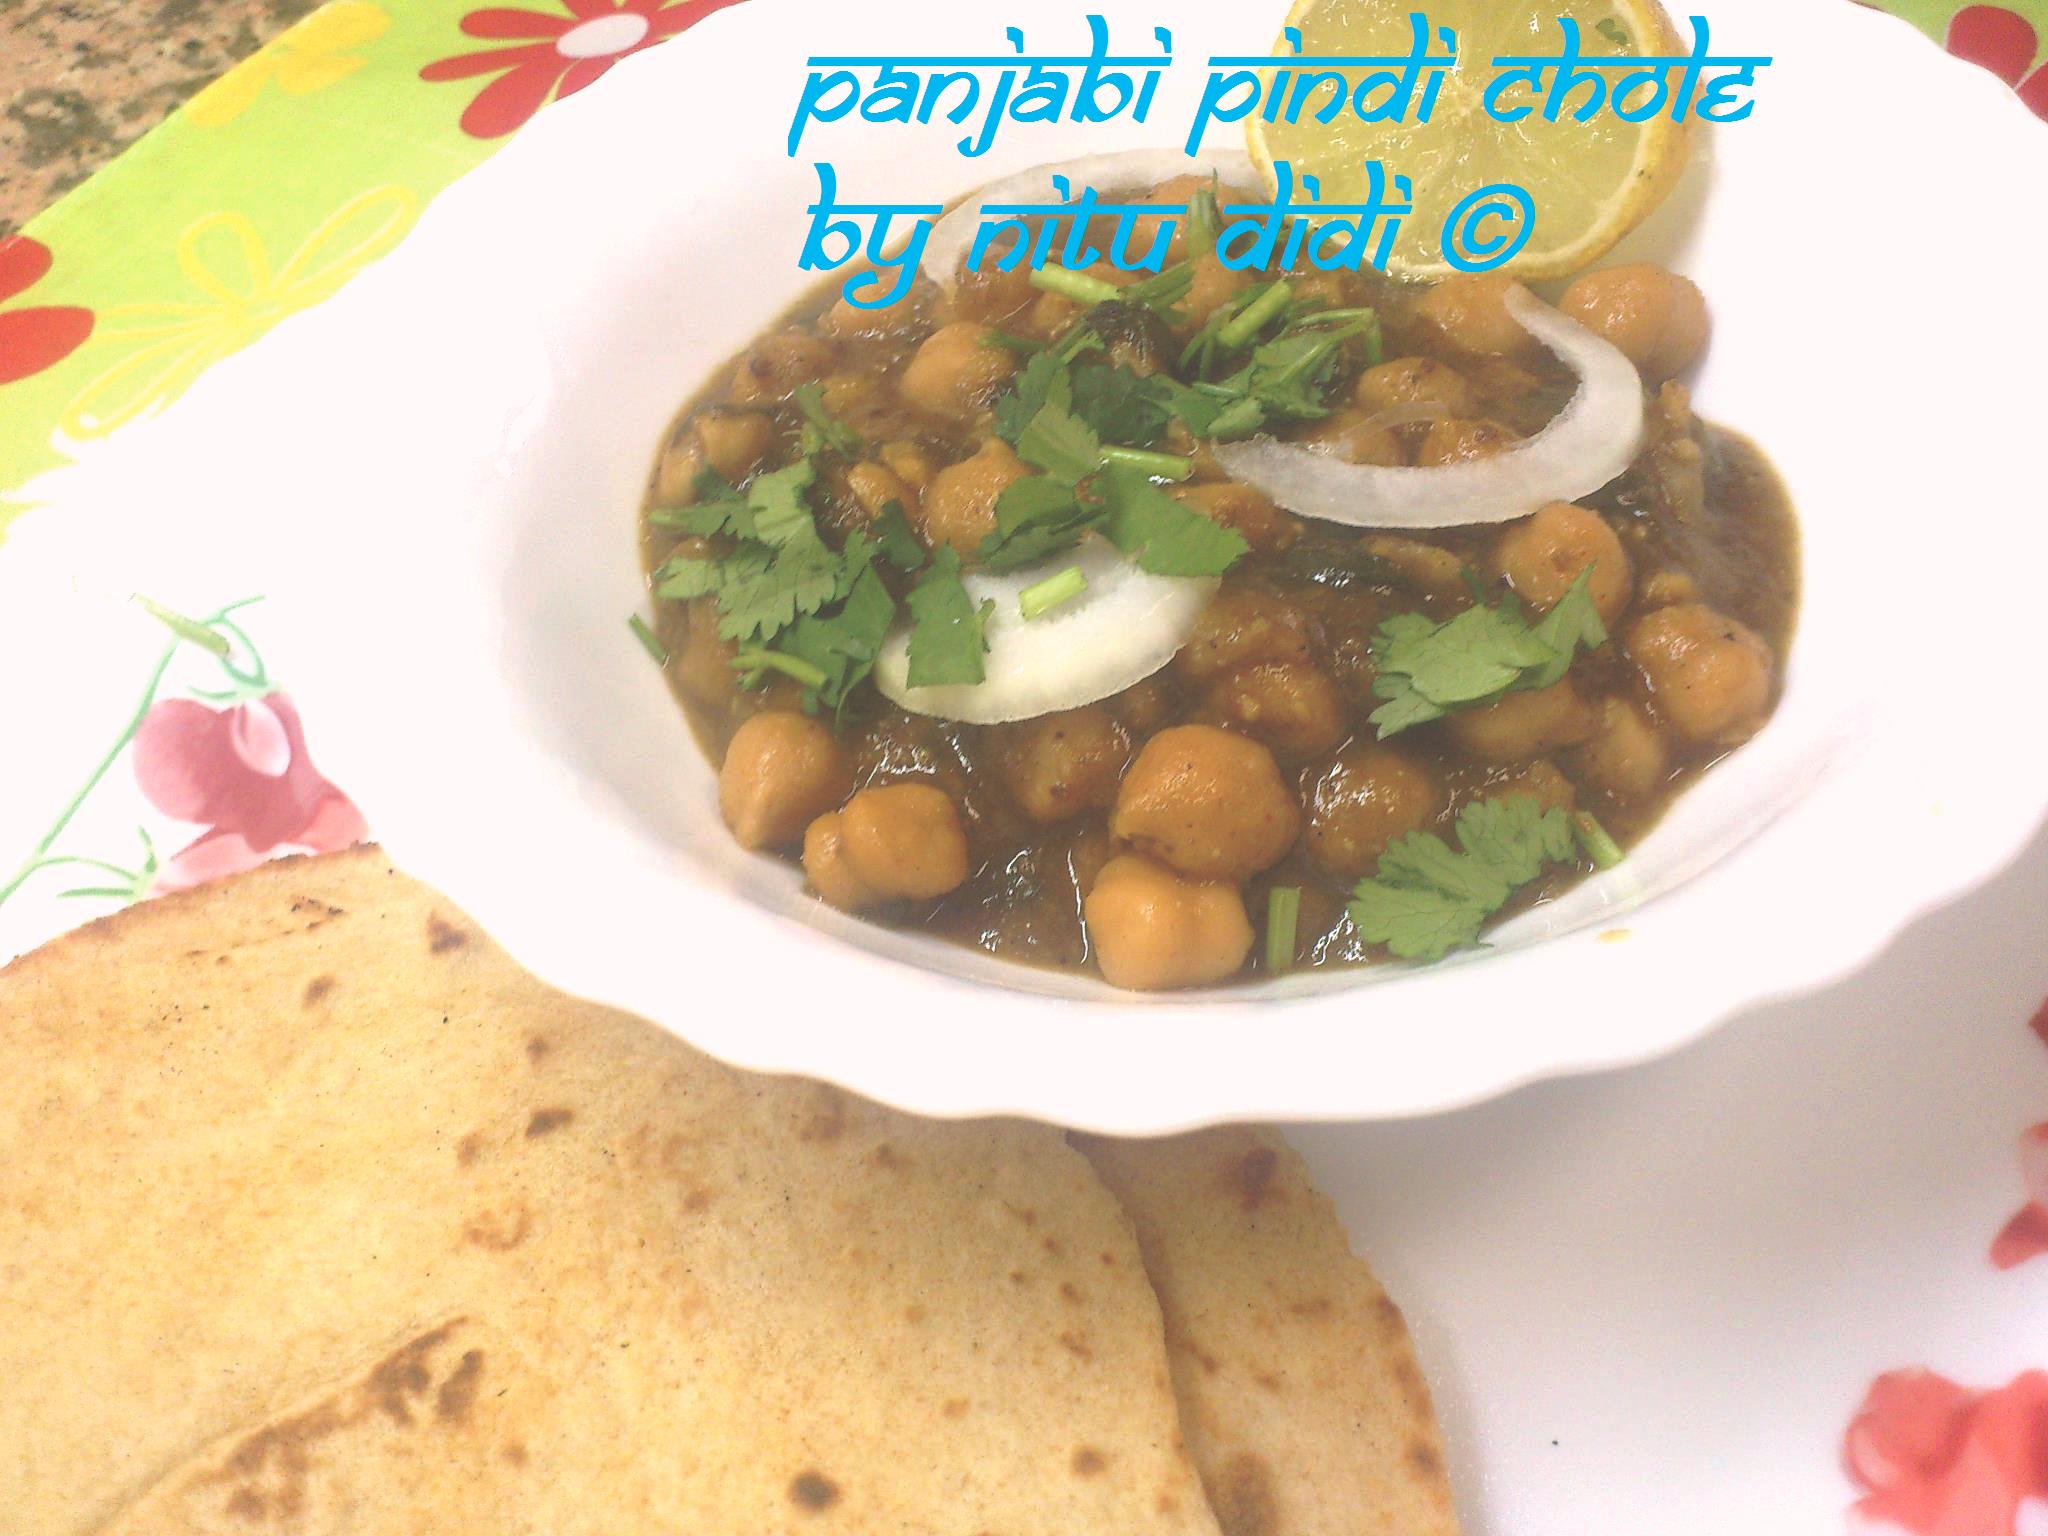
On this day of Baisakhi i bring you this typical punjabi recipe from the land of Punjab. Actually i got this recipe from a dear friend of mine Shobha Keshwani`s blog. I took a look at it and wanted to make it a little differently… So thanks to Shobha , who is a dear dear friend of mine ( we yet have to meet and give each other a hug) i just tweaked her recipe a teeny weeny bit and made it a little more “internationally”. For her PINDI CHOLA RECIPE click HERE. I served them with a whole wheat baked kulcha which i will also share the recipe.
INGREDIENTS:
500 grams of boiled chickpeas (this is the one i used)
To be ground to a paste:
1 large onion
1″ piece ginger
4 cloves of garlic
To be ground to powder:
2 bay leaves
6 cloves
1″ stick cinnamon
2 black cardamoms
2 tablespoons of coriander seeds (dhaniya)
1 tablespoon of cumin seeds (jeera)
1 teaspoon of caraway seeds (shah jeera)
1 aniseed
1 teaspoon of fennel seeds (saunf)
Juice of 1 lime, or to taste
1 teaspoon of amchoor powder(dry mango powder)
1 teaspoon of red chilli powder
Salt to taste
4 tablespoons oil or ghee
METHOD:
Grind the onions, ginger and garlic to a paste in a blender ( i used my bullet). Heat the oil/ghee in a pan and add the paste. Cook it over medium heat till it starts to stick…once it sticks to the bottom add a bit of water and continue to cook it till its slightly browned and the raw smell has gone. This is an important step…Try to use a good nonstick pan for this. While onion paste is browning grind the whole spices to a powder ( i used the spice jar for my bullet to do this). Once the paste is done, add the powdered spices, salt and red chilli powder. Then add the boiled chickpeas/chola/garbanzos and mix well. Lastly add the lemon juice to taste. Goes well with puris, naans or kuchas. I made a kulcha out of whole wheat flour and sharing the recipe below. Serve with onion rings, chopped coriander leaves and green chillies.
KULCHAS ALA NITU
150 grams of white natural yogurt/curds/dahi, room temperature
1/2 teaspoon of soda bicarbonate
2 tablespoons of extra virgen olive oil
1 teaspoon of salt
50 ml of water
whole wheat flour as needed
METHOD:
Mix the yogurt and the soda bicarb and leave it for a few minutes. You will see bubbles, then add the oil, salt and the water. Mix well. Add enough whole wheat flour so you can make a dough out of it. Add the flour you need spoon by spoon till you get a soft dough. Put it in a covered container and keep in a warm place for about 3-4 hours. After that time, just knead it again, Make into balls. Roll out into rounds not too thin and bake in a hot tawa (iron gridle or pan) till slightly browned on both sides. Serve with your chickpeas. These kulchas can also be frozen.
NITU DIDI TIP: For Jains, please omit the onion paste and just proceed. Like my recipes?? Please DONATE
Want to buy the amazing bullet? Do send me a message
“Chutney Paneer” is a nice tangy, spicy , non creamy way to make paneer. It is easy and healthy because we use a lot of greens in this, contarary to palak paneer which usually has cream and butter in it. If you have coriander leaves which are going to go bad, just make this recipe and your family will love it 🙂 You can also use left over chutney to make this…yes i am not joking 🙂
INGREDIENTS:
Paneer made out of 1 litre milk (see HERE for how to make home made paneer)
1 cup of chopped coriander leaves, i used my magic scissors to chop them
2 tablespoons of chopped fresh mint leaves
2-3 green chillies or more if you like it spicy
1 onion, quartered
4 cloves of garlic
1″ piece ginger
2 red tomatoes, quartered
salt to taste
a pinch of pure turmeric powder
3 tablespoons of olive oil
METHOD:
Put the tomatoes in the blender and blend…then add all the other ingredients slowly and blend till you get a fine paste. Heat the oil in a saucepan and add the ground paste and cover. Cook for about ten minutes or till you see the oil separating from the paste and the raw smell has disappeared. Do cover the pan as the paste will start spluttering as it gets cooked. Once its cooked, add a cup of water and let it boil. Add the paneer which you have cut into cubes (if you want you can deep fry the paneer…i usually dont) and cook till you get the desired gravy consistency,
NITU DIDI TIP:
If you want you can add some kasuri or fresh methi (fenugreek leaves) into the blender.
How to store coriander leaves for a long time? Well what i do is i remove all the yellow leaves, and any other damaged leaves. I then chop the roots off. I put it in a kitchen towel spreading it and wipe it dry. Then i wrap it carefully in newspaper or put it in a brown paper bag. It keeps well for a week if the coriander leaves are fresh,
HEALTH BENEFITS OF CORIANDER LEAVES
It is rich in many vital vitamins including folic-acid, vitamin-A, beta carotene and vitamin-C that are essential for optimum health. Vitamin-C is a powerful natural antioxidant. Cilantro leaves provides 30% of daily recommended levels of vitamin C. The health benefits of cilantro are many.
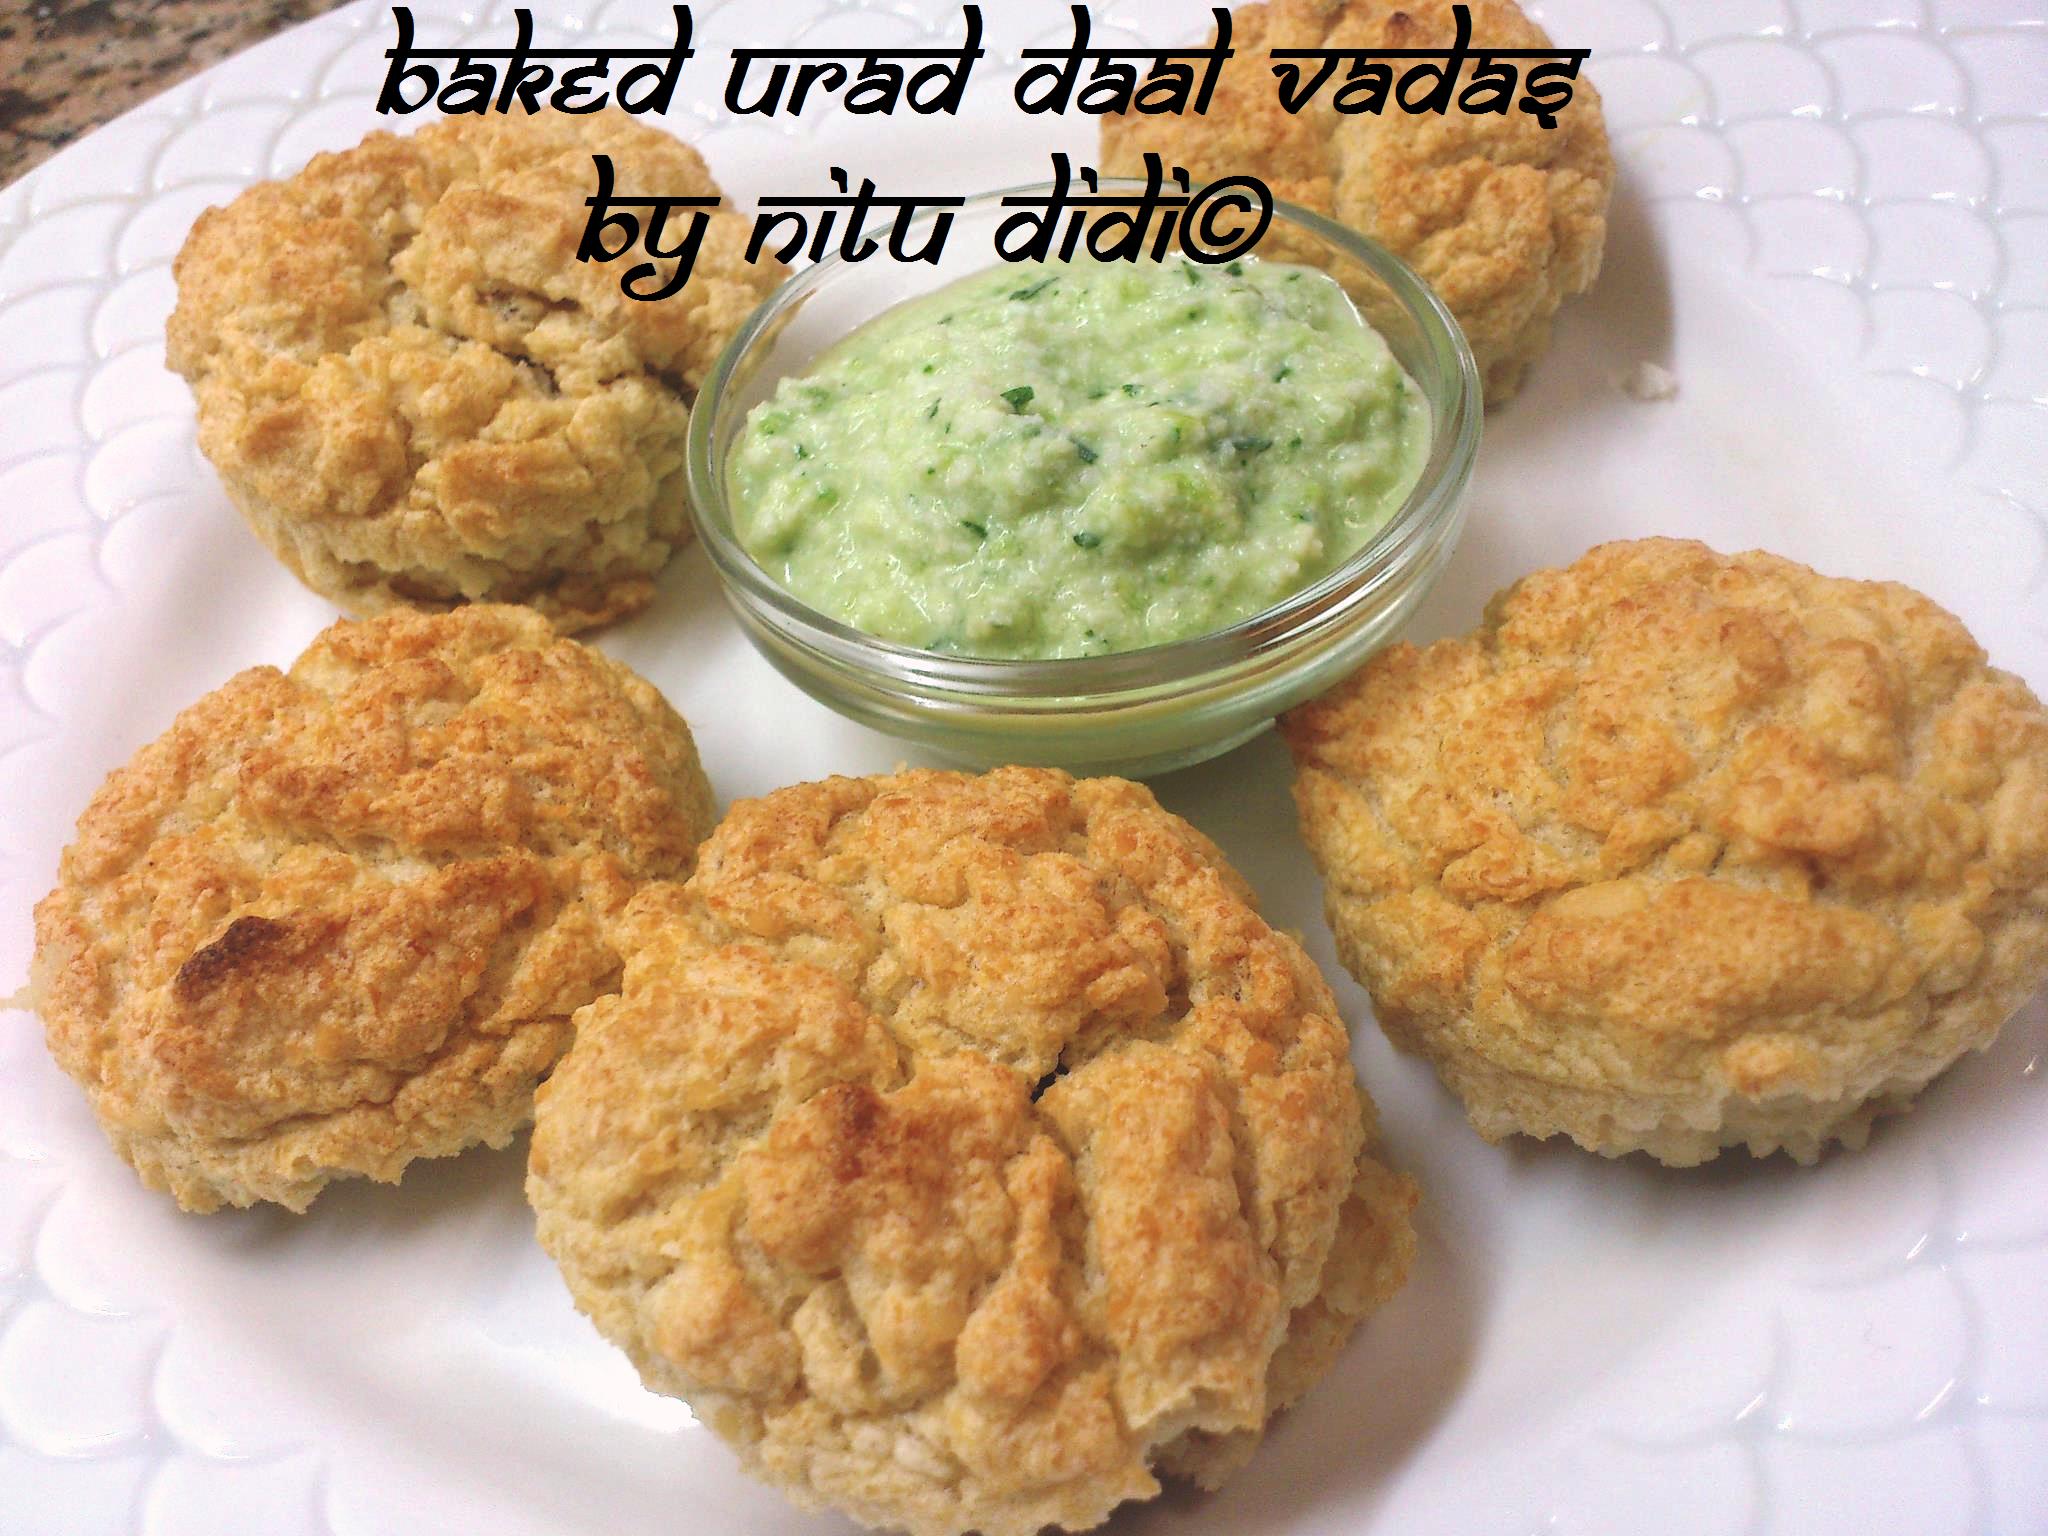
Why miss out on your favourite snack just because its deep fried? Now…you can enjoy your “medhu vadas” if you are on an oil free diet or need to take care of your heart. I tried this recipe and it came out quite nice. Frankly nothing can replace the texture or crispiness of deep fried food, but this is the best thing next to it. Can you make it into dahi vadas? Well i did not try but i suppose you can. The texture is a bit dry , so maybe its best you eat it with a chutney or a sambhar or rasam. This is the much awaited,much soughted after recipe.
INGREDIENTS:
1 cup of white urad dal, washed several times and soaked over night in 4 cups of water
1″ piece ginger
salt to taste
1/2 teaspoon of cumin seeds
Can also add : chopped fresh green chillies, coriander leaves, cracked black pepper (for a masala version of this)
METHOD:
Drain the daal and put it in the blender ( i used my amazing bullet) with a few tablespoons of water, and the chopped ginger. Blend into a very smooth batter. Put it in a bowl to ferment for a few hours. Add salt and cumin seeds and the other spicy ingredients if you want. The batter should be light and frothy (this depends on how well you blend it). Take a muffin tray and line it with paper muffin cases. Spray each case with Olive oil spray (this is the one i used) and then add a few tablespoons of this fluffy batter. Bake in a preheated oven at 200 degrees till brown on top. Remove and serve hot with coconut chutney.
FOR THE COCONUT CHUTNEY:
1 cup of plain natural room temperature yogurt
1/2 cup of dessicated coconut, blended.
3 cloves of garlic
1/2 ” piece ginger
4 green chillies
1/4 cup of coriander leaves, washed and chopped ( i used my magical scissors for this)
1 tablespoon of fresh mint leaves chopped
Juice of half a lime
salt to taste
METHOD:
Put the dessicated coconut in the blender ( i used my amazing bullet) and powder it to an even smoother texture.
In the blender ( i used my amazing bullet), add the yogurt and the rest of the ingredients one by one blending after each ingredient. Grind to a paste. Remove into a dish, add the dessicated coconut and salt. Taste and correct seasoning. This keeps for a few days in the fridge if its left over !!!
NITU DIDI TIP:
You can also deep fry the vadas…i already have a recipe for that. Can you bake them without the cooking spray? Well you can..but they might stick to the cupcake cases….What if you dont have a muffin tray? Dont worry…you can use a normal baking tray. Just spray it and add spoonfulls of the batter in the tray leaving some space between each spoonful. For Jain recipe, just omit the ginger and garlic in both recipes
Stay Happy ! Stay Healthy! Stay Blessed!
Want to buy my amazing bullet? Do send me an email ….. Love my recipes? Please DONATE…..
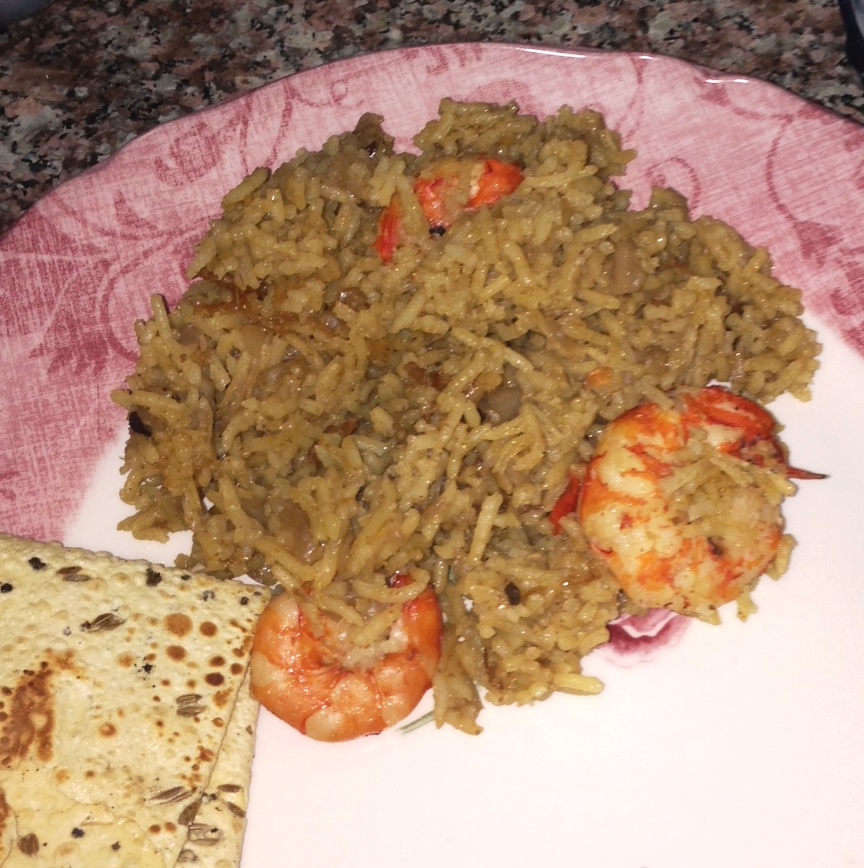
Another great recipe from Kumar Sadhwani whos a great foodie! He loves to cook and share his lovely recipes with all of us 🙂 Thank you so much Kumar for this excellent pullao. I am sure many will love to make this and will be able to satisfy their cravings for rice and prawns! If you have a cholesterol problem you can substitute prawns for any white fish you like.
INGREDIENTS:
4 onions chopped
A teaspoon of garlic
A teaspoon of ginger
2 green chillies chopped
1 pc. Black cardamom pounded
2 small pcs. Cinnamon sticks slightly pounded
1/2 tsp. red chili powder
1/2 tsp. clove powder
1/4 tsp nutmeg powder
500-750 gms tiger prawns shelled and deveined.
2 tbsp. cooking oil
1.5 cups basmati rice soaked and washed.
Heat oil in pan and fry the onions til pinkish. At this stage I add a pinch or two of sugar to the onions. It helps develop color while onion is not over done. Then add the garlic and ginger and chilies. Stir for a bit then add the cardamom, cloves, cinnamon and nutmeg and chili powder. Stir well on low heat till the fragrance comes up. Add a cup of water and cook on low heat. Add slowly some more water and cook further. Add the washed rice into the mix while checking the seasoning (a good way to measure water for cooking rice is to double the quantity of water to the quantity of rice.)In pulao a little more water is added to cook the masala. When the rice starts to boil add the tiger prawns. Garnish with coriander. You can make chicken pulao this way or veggies pulao. I love adding some frozen peas to the pulao toward the end.
Burfis (indian fudge ) are a favourite with everyone. One does not need to wait for a festive ocasion to have this delicious “indian sweet meat”. Burfis usually take time and effort to make , but i came across a recipe online and decided to try it out because i found it totally innovative and quick! The first thought that came to my mind is that my followers would love this. We Indians tend to offer sweet meats to our gods on all religious festivals and its a custom to always make something sweet in our homes on these days. You can make this recipe with many twists, flavour it with saffron, cardamom, rose water, add nuts of your choice to this. I made this with some saffron and used some caramelised almonds. I have recorded a video to show you exactly how it is done so that you don´t go wrong. The first time i made this i got the sugar syrup all wrong. It crystalised too quick because i wasn´t alert and i still added it to the milk powder and i got a crunchy burfi! The second time i got it right! So… in 2 days it is Cheti Chand a sindhi festival and so for this ocasion i am sharing this lovely recipe for all of you to make.
INGRIENTS:
2 cups of full cream milk powder (i used THIS one)
200 ml of full liquid cream (also known as heavy or double cream)
3/4 cup of white sugar
1/4 cup of water
1 tablespoon of full fat milk
10 strands of Nitu Didi pure spanish saffron
2 cardamoms, powdered
nuts of your choice, i used chopped caramelised almonds (for my recipe see HERE)
METHOD:
Put the milk powder into a bowl and add the cream to it. Mix it well to make a paste making sure there are no lumps. Put this bowl into the microwave on full power for 3 minutes. Remove and check consistency. It should get thick, if not thick cook it again in the microwave for another 2 minutes. (This depends on the texture of the cream and the moisture in the milk powder). While the milk is cooking in the microwave put the sugar and water to heat in a pan ( i used my ceramic pan) and boil it till it reaches 1 thread consistency. Keep on stirring so it does not crystalise. Add the saffron and cardamom to the cooked saffron mixture and put in the sugar syrup. Mix well. Put into a plate and flatten with a spoon , OR wait till the mixture thickens and shape into balls. Roll in nuts of your choice or you can dip them into melted chocolate. These are just a few variations i am giving you.
HEALTH BENEFITS OF SAFFRON:
Saffron is good for over all well being. It helps cure depression, insomnia and helps build your defenses.
To buy my saffron do visit my online store
NITU DIDI TIP: If the mixture is too soft, dont panic, just add some more milk powder. VIDEO ON HOW TO MAKE KESARI BURFI
If you appreciate my recipes, and want to help keep this page running do DONATE
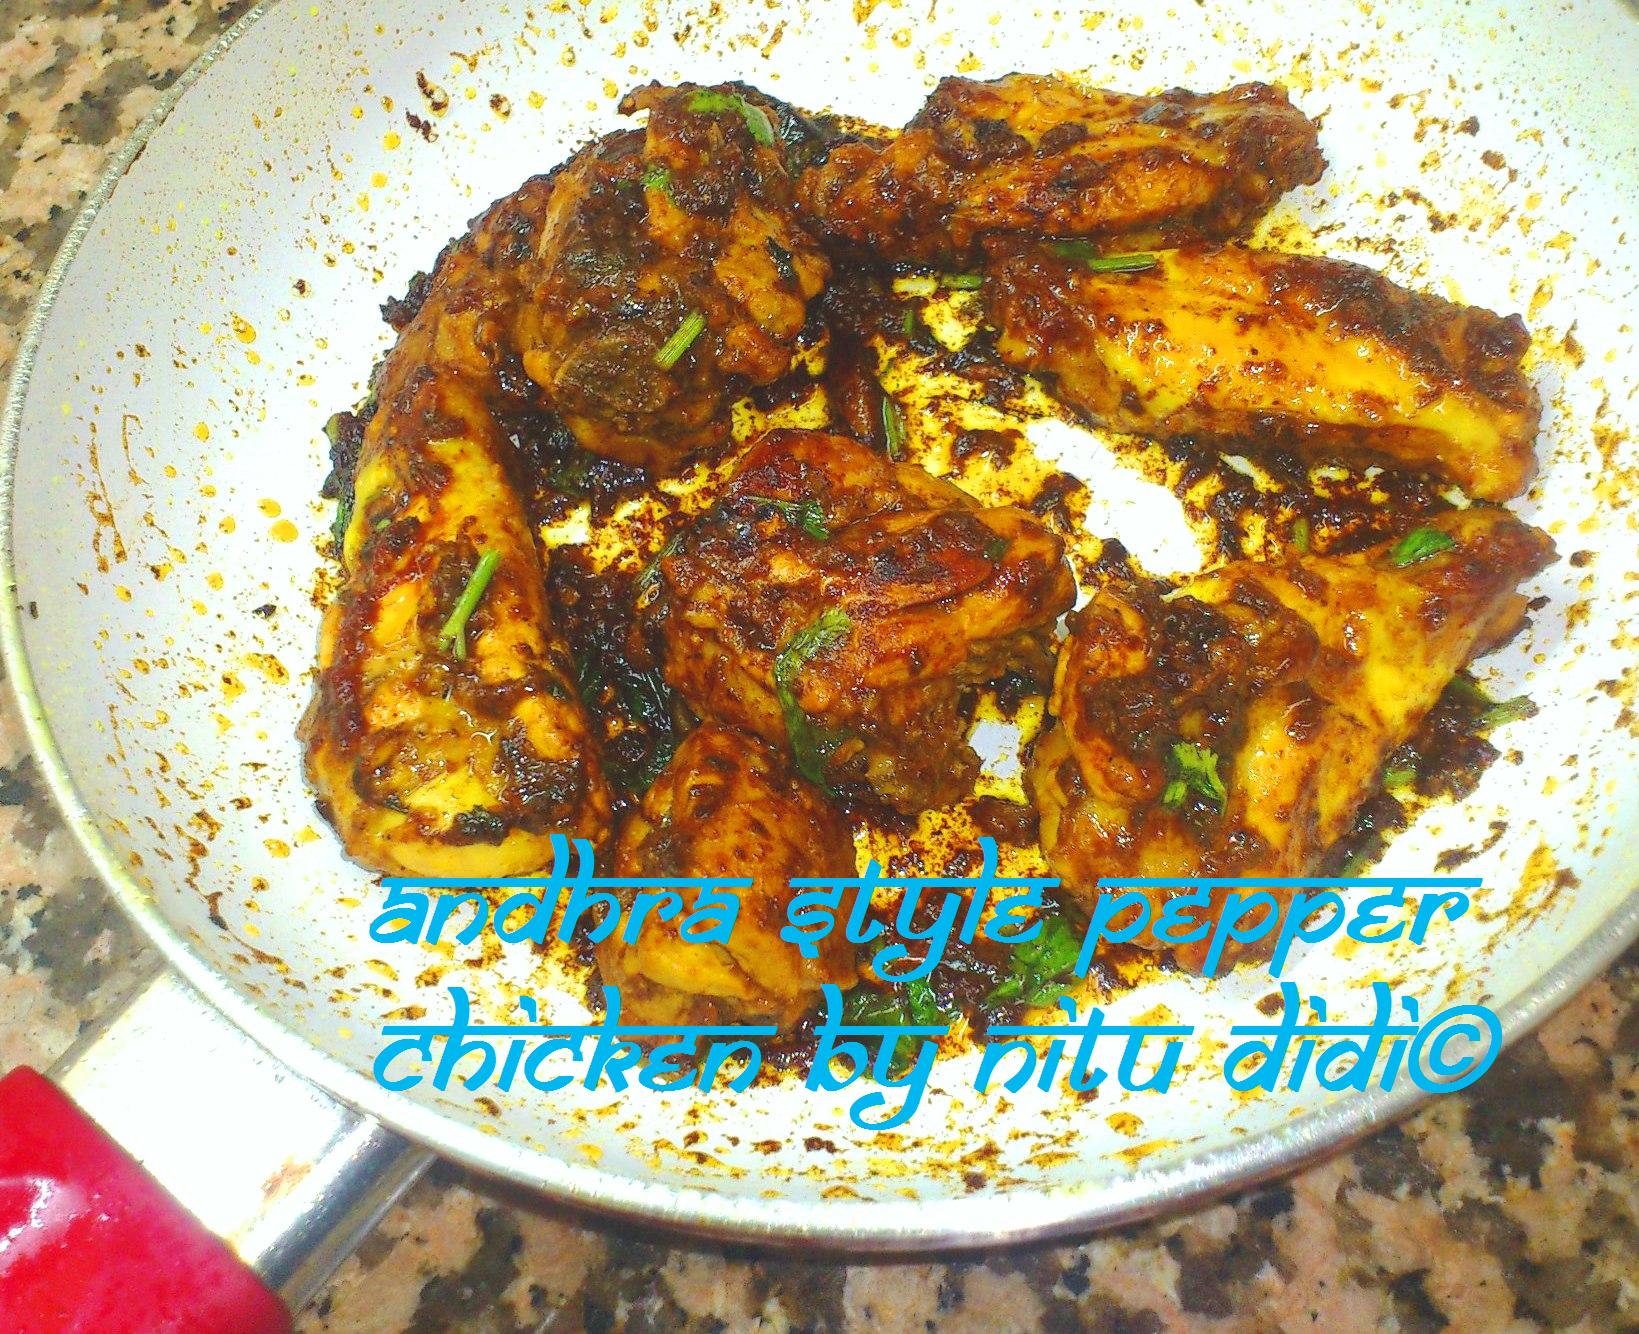
Andhra cuisine is spicy and tangy. This pepper chicken is very popular in Andhra Pradesh. There are so many recipes on the internet available. I remember trying this chicken when i was in Bangalore and was it hot! I love spicy food so that was not a problem for me. Can you make this without spice? I doubt it, but if you want to have a go at this you can reduce the amount of spice. Basically in this recipe green chillies and red and black pepper is used. I am told that its a dry dish served as a snack or with a daal, but you might just need to add some water to cook the chicken. I used my cook “n” serve ceramic pans for this as they are totally non stick. So..lets spice up our chicken today!!
INGREDIENTS FOR ONE: (because no one except me can eat this spicy dish!!!)
4 pieces of chicken with bones of your choice, cut into small pieces (this way it cooks faster)
2 cloves of garlic
1/2 ” piece ginger
2 green chillies
salt to taste
1 tablespoon lemon juice
1/2 teaspoon of freshly ground black pepper powder
1/4 teaspoon of hot red chili powder
Pinch of turmeric (it has amazing health properties)
2 tablespoons of olive oil
METHOD:
Wash the chicken pieces well and pat dry. Make a paste of the ginger, garlic and green chillies using the blender ( i used my magic bullet). Marinate the chicken in this paste with salt, lemon juice and turmeric for a few hours. This makes the chicken tender and easy to cook. Heat the oil in a good nonstick pan (i used my ceramic pan) and then add the chicken pieces carefully into it. Cook covered for 5 minutes turning the pieces every two minutes or so. Once the chicken has dried up, add the black pepper and red chilli powder and cook till the chicken starts to turn brown. Check if its done, if not you can add a little water and cook till dry and the chicken is thoroughly cooked. Taste, correct seasoning and add some more lemon juice. Serve as a side dish or as a snack.
NITU DIDI TIP:
Can this be made boneless? Yes it can with chicken leg and thigh meat. You can also add a few curry leaves while its cooking for extra flavour. How to check if the chicken is cooked? If you prick the chicken with a fork and it goes in easily with the juices running out clear means the chicken is done. Many recipes of this andhra chicken use cloves, cinnamon etc. I made it just this way and it tasted awesome!
To buy my ceramic cook”n”serve pans do visit my online store
If you like my recipes do feel free to “donate”